
Texas Woman's University was featured in the Winter 2008 edition of the Quality Matters (QM) newsletter - Quality Matters News.
The article about TWU is feature in the Subscriber Corner. It discusses the work that Dr. Keith Restine and faculty participants have done throughout our subscription to QM.
View the article at http://www.qualitymatters.org/Documents/NewsletterWinter08.htm.
Friday, February 22, 2008
Monday, February 11, 2008
Uses of Discussion and Discussion Groups in Distance Learning
February 19, 2008
1 p.m.
Presented online by Robin Bartoletti and Tracey Mac Gowan Instructional Design Specialists for the Office of Lifelong Learning
Come and learn what you can do to effectively use discussion forums and student moderated discussion groups to increase interaction and foster a sense of community in your distance education courses. Various examples will be shared.
The presentation will be delivered using Wimba. All you need is an internet connection or an available phone line.
Log-in Instructions
1. To access the live presentation at 1 p.m. on the 19th, go to URL: http://208.185.34.120/launcher.cgi?room=_SMDiscussion.
2. Run the Setup Wizard to make sure you have everything you need to view the session.
3. Click on the Participant Login.
4. These sessions have been designed so that you can log-in without a password. All you need to do is type in your name and click enter.To dial into the audio only, call 646-367-1174 and use this PIN: 37000390.
We look forward to seeing you online!
Planning and Organizing for Distance Education
February 13, 2008
2 p.m.
Live from your desktop! See the log-in instructions below.
Presented online by Heidi Ashbaugh
Instructional Design Specialist for Lifelong Learning
This presentation will cover some of the basic elements of getting ready to teach online. The presenter will discuss how to design a clear and navigable course, how to organize information and how to plan for interaction.
The presentation will be delivered using Wimba. All you need is an internet connection or an available phone line.
Log-in Instructions:
1. To access the live presentation at 2 p.m. on the 13th, go to URL: http://208.185.34.120/launcher.cgi?room=H2.
2. Run the Setup Wizard to make sure you have everything you need to view the session.
3. Click on the Participant Login.
4. These sessions have been designed so that you can log-in without a password. All you need to do is type in your name and click enter.
5. To dial into the audio only, call 646-367-1174 and use this PIN: 37000432.
We look forward to seeing you online!
New DE Faculty Webpage for Archived Wimba Presentations
The Office of Lifelong Learning is pleased to announce a new webpage that will house archived presentations that were created through Wimba. The webpage is located at http://www.twu.edu/dl/faculty/development.htm
Currently, there are three archived presentations available for immediate viewing:
· Teaching Online Group Work
· Feedback Strategies for Distance Education
· Taskstream
Two more presentations will be presented live, through Wimba and archived on the page as well. Please join us for these two presentations:
· Wednesday, February 13, 2 p.m. - Planning and Organization for Distance Education
· Tuesday, February 19, 1 p.m. - Uses of Discussions and Discussion Groups for Distance Education
Log-in information for both the archived and live presentations is provided on the webpage.
These presentations were done through a trial version of Wimba that will end in March. After the trial is complete, the presentation slides will be made available for the remainder of the spring semester.
We have a brief survey on the page to help us determine if having distance education faculty development available at all hours from your desktop or home would be helpful. Please take a few minutes to fill out the survey so that we can better serve you!
Monday, February 4, 2008
Creating a Web Banner in PowerPoint - Instructions For PPT Office 2003 only
* Note, if you are using Office 2007, the instructions have changed. (click "Layout" on the Home tab; click the the "Design" tab to get to the "Page setup" box. Other functions described below have also changed location.)
If you are looking for a quick, easy way to make a banner for your Blackboard site, or for any Web site, you need look no further than Microsoft PowerPoint.
1. Open PowerPoint.
2. Click Format Slide layout and select a Title Only layout.
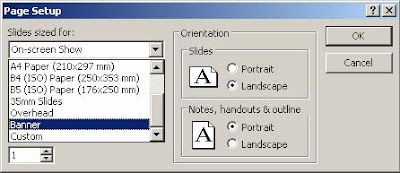
3. Click File Page Setup.
4. Drop the Slides sized for box down, select Banner, and click OK.
5. Click in the text box and type a banner title.
6. Add color or fill effects to the banner background:
a. Click Format Background.
b. Select a color or fill effect from the drop down box.
c. Click Apply.
7. Change the font, size or color of the title by highlighting and editing the text, if necessary.
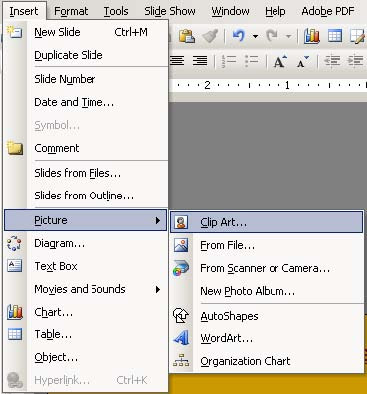
8. Insert an image on the banner by clicking Insert Picture Clip Art or Insert Picture From File if you have a scanned or saved image from the Web.
9. Resize the image, if necessary, by clicking once to select it and dragging the image size from one of the corners.
10. Move or rearrange the title and image(s) by clicking, holding and dragging them to the desired location. Drag the title by the border (anywhere but on the resize handles on the sides and corners) and drag an image from its center. If you find it difficult to place objects precisely because they keep "snapping" to the invisible grid on the slide, hold down the Alt key while you drag, and release the mouse before the Alt key.
11. Save the slide as an image file.
a. Click File Save As.
b. Enter the name of the banner for the file name.
c. Under Save as type drop down the list and select *.jpg (you will have to scroll to see this choice).
d. Click the Save button and answer "No" to the question "Do you want to save every slide in the presentation?" (This will save only the first slide as the image.)
12. Close PowerPoint.
To upload your banner to your Blackboard site:
1. Go to the Control Panel of your course.
2. Go to Course Design under the Course Options heading.
3. Click the Course Banner link.
4. Use the Browse… button to locate the banner file and click Open.
5. Click Submit.
6. Return to the Announcements Page of your course site to view the banner.
If you are looking for a quick, easy way to make a banner for your Blackboard site, or for any Web site, you need look no further than Microsoft PowerPoint.
1. Open PowerPoint.
2. Click Format Slide layout and select a Title Only layout.
3. Click File Page Setup.
4. Drop the Slides sized for box down, select Banner, and click OK.

5. Click in the text box and type a banner title.
6. Add color or fill effects to the banner background:
a. Click Format Background.
b. Select a color or fill effect from the drop down box.
c. Click Apply.
7. Change the font, size or color of the title by highlighting and editing the text, if necessary.
8. Insert an image on the banner by clicking Insert Picture Clip Art or Insert Picture From File if you have a scanned or saved image from the Web.

9. Resize the image, if necessary, by clicking once to select it and dragging the image size from one of the corners.
10. Move or rearrange the title and image(s) by clicking, holding and dragging them to the desired location. Drag the title by the border (anywhere but on the resize handles on the sides and corners) and drag an image from its center. If you find it difficult to place objects precisely because they keep "snapping" to the invisible grid on the slide, hold down the Alt key while you drag, and release the mouse before the Alt key.
11. Save the slide as an image file.
a. Click File Save As.
b. Enter the name of the banner for the file name.
c. Under Save as type drop down the list and select *.jpg (you will have to scroll to see this choice).
d. Click the Save button and answer "No" to the question "Do you want to save every slide in the presentation?" (This will save only the first slide as the image.)
12. Close PowerPoint.
To upload your banner to your Blackboard site:
1. Go to the Control Panel of your course.
2. Go to Course Design under the Course Options heading.
3. Click the Course Banner link.
4. Use the Browse… button to locate the banner file and click Open.
5. Click Submit.
6. Return to the Announcements Page of your course site to view the banner.
Subscribe to:
Posts (Atom)
