If you are looking for a quick, easy way to make a banner for your Blackboard site, or for any Web site, you need look no further than Microsoft PowerPoint.
1. Open PowerPoint.
2. Click Format Slide layout and select a Title Only layout.
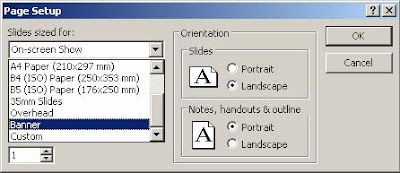
3. Click File Page Setup.
4. Drop the Slides sized for box down, select Banner, and click OK.

5. Click in the text box and type a banner title.
6. Add color or fill effects to the banner background:
a. Click Format Background.
b. Select a color or fill effect from the drop down box.
c. Click Apply.
7. Change the font, size or color of the title by highlighting and editing the text, if necessary.
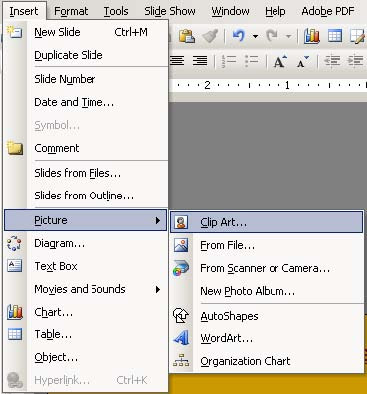
8. Insert an image on the banner by clicking Insert Picture Clip Art or Insert Picture From File if you have a scanned or saved image from the Web.

9. Resize the image, if necessary, by clicking once to select it and dragging the image size from one of the corners.
10. Move or rearrange the title and image(s) by clicking, holding and dragging them to the desired location. Drag the title by the border (anywhere but on the resize handles on the sides and corners) and drag an image from its center. If you find it difficult to place objects precisely because they keep "snapping" to the invisible grid on the slide, hold down the Alt key while you drag, and release the mouse before the Alt key.
11. Save the slide as an image file.
a. Click File Save As.
b. Enter the name of the banner for the file name.
c. Under Save as type drop down the list and select *.jpg (you will have to scroll to see this choice).
d. Click the Save button and answer "No" to the question "Do you want to save every slide in the presentation?" (This will save only the first slide as the image.)
12. Close PowerPoint.
To upload your banner to your Blackboard site:
1. Go to the Control Panel of your course.
2. Go to Course Design under the Course Options heading.
3. Click the Course Banner link.
4. Use the Browse… button to locate the banner file and click Open.
5. Click Submit.
6. Return to the Announcements Page of your course site to view the banner.

No comments:
Post a Comment